Total War: Warhammer 3 Chaos Dwarfs tips
Forge of the Chaos Dwarfs is finally here, adding the Dawi-Zharr to Total War: Warhammer 3. A mighty and lethal faction of Dwarfs that – simplifying a lot of lore here – joined the dark side, they are now available for players to choose in the Realms of Chaos and Immortal Empires modes.
The Chaos Dwarfs are one of the more complex factions in the game when it comes to their mechanics and how their vastly different troop types interact with each other in battle, making them quite unique and fun to play. That said, they may not be the easiest faction for beginners to get off the ground with, so we’ve compiled a few tips for playing the Chaos Dwarfs effectively, covering their economy, battle tactics, campaign goals, and more.
Chaos Dwarfs Economy 101
The Chaos Dwarfs have the most complex economy out of any Total War: Warhammer 3 faction and careful management is required to get the most out of it. It’s based on four resources: Gold, Labor, Raw Materials, and Armaments.
Gold, as usual, serves the purpose of currency to pay for army upkeep, hero actions, diplomacy, and construction of some buildings. Settlements, trade, diplomacy, and victories in battle provide more.
Labor, the foundation of the Chaos Dwarf economy, is required to properly power your mines, which in turn generate Raw Materials. The Chaos Dwarfs aren’t exactly following work safety regulations, being slavers and all that, which means your available Labor decreases every turn. When your Labor numbers no longer fulfill the manpower requirements from your mines, your economy’s efficiency and the Raw Material output goes down. That’s why you need to keep the Labor coming by raiding, winning battles, and bringing in new slaves through Convoys – more on that later.
You can use Labor for various other actions as well, such as building structures instantly, which is super powerful.
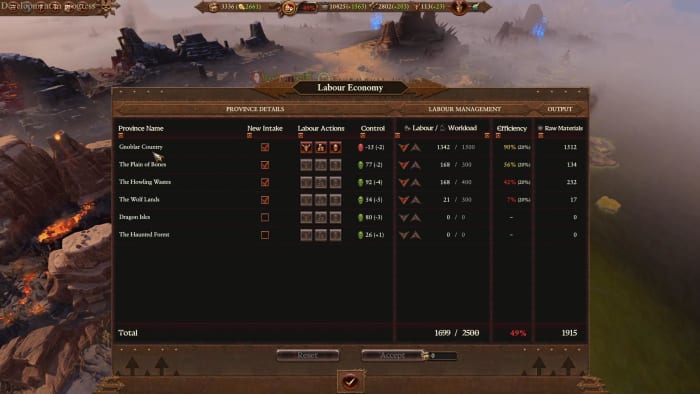


Raw Material is needed to upgrade your main settlement buildings and for Factories to produce Armaments. Raw Material is generated by your Outposts, can be gained through the Tower of Zharr, or traded for through Convoys.
Armaments are an important part of your war machine: You require them to increase your unit capacity, maintain powerful unit upgrades, produce strong units like your artillery pieces, and unlock tech. They are mainly produced by Factories, but you can also gain them through the Tower of Zharr.
You’ll want to fill the first two to three provinces you conquer with settlements of the Outpost type, which provide Raw Materials as long as you supply enough Labor. This way you’ll have enough of the resource to upgrade your main settlement and build up a bank you can later turn into Armaments, which aren’t really needed that much in the early phase of the game.
You can then add a Factory province through conquest or – and this is always a good option to keep in mind – you can simply switch out the Outpost settlements for Factories in any of your provinces by using the option below the settlement building icons. This will cost you Gold, as you’ll need to replace all the settlement buildings, but allows you to rapidly switch your economy into a sort of war economy that pumps out Armaments instead of Raw Materials.
While you can mix Outpost and Factory buildings in your provinces, it’s advantageous to build provinces with only one type. That reduces the amount of micromanagement you need to do, such as shifting around Labor, activating and deactivating Labor intake and so on. Natural resources like Marble and Obsidian, which for the Chaos Dwarfs produce Raw Material when supplied with Labor, or Iron and Timber, which grant a bonus to Armament production, may dictate which provinces you’ll want to make mining or manufacturing districts, but otherwise their locations don’t really matter.
Keep the Labor coming and in line
Your Outposts will need a lot of Labor and just sitting around at home won’t get you any fresh workers. As the Chaos Dwarfs, you’ll really want to send out some of your armies to far-away lands you can steadily raid and ransack – funnily enough, world conquest would actually ruin your economy, since you couldn’t get enough Labor anymore to produce Raw Material. Setting up a lone Tower settlement on the far end of the world as a base for raiding expeditions might be a good idea and is pretty easy since you can rush production by sacrificing some Labor – if you need a fortress from one turn to the next, the Chaos Dwarfs have a way of providing it.
Your second source of Labor are Convoys, a variation of the Cathayan Caravans. They allow you to make up for holes in your economy by allowing you to trade resources you might have a lot of for resources you are lacking – you can sell Armaments for Gold, or buy Labor with Gold, and so on. Offers change up every ten turns. In addition to bringing in new resources, Conyos generate strong items and ancillaries for you as well, so it’s always worth sending them out.
Note that your Labor decreases more sharply each turn if your province has low Public Order, so make sure to keep your unpaid helpers in line to avoid massive Labor bleeding by building Public Order structures and the use of provincial Commandments.
Always build Towers
While you can transform a province’s main settlement into an Outpost or a Factory as the Chaos Dwarfs, you should in most cases opt to build a Tower. Through their unique building options, Tower’s can provide you with useful bonuses such as factionwide hero and lord recruit ranks as well as Winds of Magic reserves, increased hero capacities, and a whopping 30% movement bonus in that province – that’s especially great against the annoying AI trying to avoid your armies and looking to sack your settlements by abusing the Forced March stance. Towers provide the bulk of your Gold income as well, generating revenue without you needing to invest Raw Materials. Naturally, Towers are also where you can recruit your best units such as Infernal Ironsworn, Fireglaives, and Lammasu.
Finally, there is the aesthetic value of ominous dark Towers dominating the landscape to consider – can you really call yourself a dark lord of anything if you don’t have massive black skyscrapers from which you can proclaim world domination and march forth your armies?
Make use of Gorduz Backstabber

Gorduz Backstabber comes with two legendary items and can get a Giant Wolf to ride on.
Creative Assembly
You can recruit the legendary hero Gorduz Backstabber as any Chaos Dwarf lord early on in the campaign and you should definitely do so, because he’s a fantastic character. You can focus his skill upgrades in two different ways: either make him an absolute monster of a fighter, who’s able to challenge the likes of Grimgor Ironhide, or focus on his abilities that upgrade your Hobgoblin units, which makes them perform better by a massive margin than would otherwise be possible.
If you choose to focus on the second path to start with, you should definitely consider embedding Gorduz in a pure Hobgoblin army and send it out on one of the Labor-generating raid expeditions mentioned above – while Hobgoblins will never match your elite troops, they can hold their own when supported by Gorduz and will be a pain for your opponents to deal with as you run around their territory, sacking their settlements.
The Art of War, Chaos Dwarfs Edition

Chaos Dwarfs can be quite challenging to play early on, so keep your wits about you.
Creative Assembly
Early Chaos Dwarf armies are very strange to control, because you’ll have a hard core of tough and steadfast Chaos Dwarf troops mixed with a lot of Hobgoblins and Greenskin Laborers, who are more, shall we say, Skaven-like in their loyalty. If you expect to have an ironfisted, relentless juggernaut of a military at your disposal immediately, you’ll be disappointed. Your Chaos Dwarfs will hold their ground, but you’ll need to do a lot of micromanagement with your other units, since they break easily, run away for a bit, and then recover to be sent into battle anew.
Your Chaos Dwarf units definitely anchor the rest of the line and will do fine on their own, so keep your eyes on your other units and babysit them instead.
Even your ranged Chaos Dwarfs like the Blunderbusses and Fireglaives will easily hold their own in melee combat for a while, though you should still micro them to keep them out of trouble – you will find that their guns are a lot more effective when shot than used as clubs. Blunderbusses will absolutely shred units from up close, so they are a perfect unit to flank the enemy with once the battle lines have been joined, while the long range of the Fireglaives makes them fantastic snipers to target key units like lords and heroes with.
Your characters with the Lore of Hashut are key components of your armies, as their spells can arrange for enemies to take additional fire damage – and that’s exactly the type of damage most of your ranged units deal. Coordinate closely with your ranged infantry to delete targets quickly. In the same vein, try characters with the Lore of Hashut and the Lore of Fire in the same army and let the fun ensue.
Make sure to visit the Hell-Forge from time to time to invest your Armaments into increased unit capacity for your Chaos Dwarf units and their upgrades – some of the upgrade combinations are incredibly powerful, giving your Chaos Dwarf troops even more of an edge over the opposition.
Hunt the right Relics in Realms of Chaos
While I won’t spoil the final battle of the Realms of Chaos campaign for the Chaos Dwarfs here, it’s a massive and epic clash with lots of different components. A very cool aspect of this is that you can influence which opponents you’ll face in the final showdown by making certain decisions during the campaign. This, by the way, is something players have wanted for a while now, and it’s awesome that Creative Assembly delivered.
You’re tasked with hunting Dwarfen Relics throughout the campaign and you are completely free which ones you’d like to pursue. You should check out the Relic screen on the campaign map to find out more about each, including their location. The main point I want to make here is that you can customize the final battle by choosing certain Relics over others, which allows you to avoid enemy factions you may especially hate to face on the battlefield.